Sculptris tips and character making
Sculptris is free and very powerfull.
I will show a complete character example, and will show main commands and some tips.
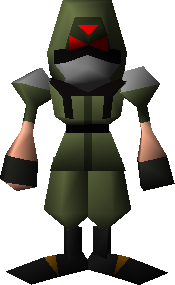
The theme is some futurist military cartoon character a little inspired by that :

Ok let's begin : )
Making the torso : Draw on the sphere to make the shape
ALT + Draw = draw holes
**** + Draw = smooth
Draw + Clay option = similar to Zbrush claytubes to draw planar stuff
Draw + Alt + Clay option = draw planar cavity

Next : Flatten + lock plane angle : to create some plane surfaces

We will create the arms as separate objects :
Choose : New Sphere
Than : Add Object

Use move tool and global setting to position new objects

To de select all objects : CTRL + D
To select one object : click on it

Gloabal scaling

Draw the arms rought shapes

Draw + Smooth all around object

Click on Wireframe view : to see wireframe
The more you zoom when painting the more detailled will be the polygons

Poly reduction tool : usefull ot reduce polys where needed
Or when a detailled part is hard to smooth

(Alt + Recude brush = increase detail polygons on surface)

Sculptris wil be more performant hidden object you don't work on

Inflate tool to make some small growing parts , growing uniform

Add new sphere to make the head

Draw , smooth, flatten tools to make some rought shape

Pinch tool : It will make hard edges very good.

1) Crease tool to make good Creases;
2) Than Pinch tool to clean, refine creases
You'll have great results using these tools one after the other.

ALt + Crease tool to make hard edges on any surface

Than pinch tool to make the hard edge very good

Flatten + Lock plane to draw hard surfaces

ALT + Draw + Clay option to draw planar holes quickly

For the head : Add new object and begin to shape it

CTRL + Draw = draw mask : Usefull to sculpt only the surface parts you want
Here it as used to flatten only the parts i needed.

Select second head part and adjust rotation using rotation tool

Hidde other parts to have lot more faster sculpting (3D coat is not Zbrush)

Some detail technique :
Make hole : ALT + Draw + Clay

Pinch tool around hole to make it look hard surface

Draw + Clay option

1) Flatten
2 ) Flatten + Lock plane option

Begin legs :
add new sphere
Flatten tool in distant zoom

Draw the legs in a first rought pass

Smooth + Flatten tool to shapeup the legs

Add new sphere objects for boots

Flatten + smooth to shape them as cylinders

Second pass :
Draw, smooth, flatten tools

Belt making :
Add nother sphere object , resize it, position it

Flatten it all around and top and bottom

Position it on character and flatten it all around
(You can pinch edges also if needed)

Side pockets making :
1) another another sphere object
2) Flatten , smooth it all around to make the shape you want

Scale it , rotate it and position it on character :

Making some torso shield part on surface :
We could add another object , but the goal here is to show some usefull drawing techniques
Draw your shape using mask

Draw volume

Begin to detail with crease tool
Use smooth tool where surface is not regular than re apply crease tool

Draw hard surface edges using :
ALT + Crease tool

Than smooth tool on irregular surfaces to make surface more planer
(Flatten tool if needed also)
+ Pinch on hard edges
+ Pinch on crease parts

Adding objects details :
Same add new sphere and shape it up in distante view using flatten tool

Adjust it's position, scaling , rotation in gloab mode

Copy paste object is possible in sculptrisand usefull sometimes

Before exporting character to obj file for retopo it's better to move some character parts around it in 3D space.
This way you'll retopo more easy and when retopo is done , you have just to move different low poly parts near the character again.

The cartoon military soldier is mainly done with some added details.

You can sculpt lot more details everywhere in Sculptris, the techniques remaining almost the same as what i showed here, or you can import the character on Zbrush or 3D coat Voxels to go lot more further in sculpting details if you target more realistic style.
Personnaly a fast and good workflow to make non detailled characters i use :
- Character sculpt and detail in Sculptris
- Retopo in 3D Coat
- Paint Diff/Normal/Specular maps to add details and textures patterns
Perhaps i'll make retopo and painting blog ?
Last tip :
I highly recommend a tablet for sculting, a mouse will never be as natural or fast.
( Even Wacom Bamboo basic ones are great at very small price)
Ok , thats the end of Blog on that Sculptris tutorial.
I hope you enjoyed it ![]()
-
 5
5


3 Comments
Recommended Comments