"The Zone" Blog 02: Setting up the terrain and importing initial props
Hello everyone! It's time for another blog post about The Zone Leadwerks level design project. I'm going to start today's update off with an overview screenshot of the map. I plan on doing this for each blog post so you can easily follow the overall progress week to week.
I've been working on setting up the major terrain features as laid out in the planning sketch. Below are screenshots of some of the roads with WIP textures, the swamp next to the military camp, the military camp itself, the creek and graveyard area, the thick woods and house, the two edges of the map with guard towers, the Bober railroad station area, and the destroyed main road bridge among other areas. There are quite a few placeholder trees on the map right now, so don't panic! I'll be optimizing the forests later.
As you might have noticed from some of those images, I have continued working on getting some textured buildings in the editor as well. While I'm still sorting out some issues with some of the normal maps, here are a few screenshots of the derelict guard outpost:
No game is complete without some crates, and I've been creating a few to populate this level. These are the base models, and I plan on using decals to add different labels to them. More versions and texture varieties are also in the works.
And here they are in the interior of the guard outpost:
Last weekend I went out to a local abandoned rail depot to take reference images. These will mainly be used to create the railroad beds, rails, ties, and other sections, but I thought you all might find some of them interesting:
View part of the railroad depot reference photo shoot.
Here is a WIP image of the new railroad bed that I'm working on based off of some of those images:
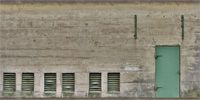
To finish up this blog post I'd like to share how I created a simple prop building for this map. My goal was to use a good texture image that I had on hand to create a nice looking background building without having to create a high poly version to bake normal maps from. I had a texture of a bunker that was roughly a 1:2 ratio in pixel size, and I started by using Photoshop to set up the texture at 2048x1024.
With this complete, I mapped it to a cube in 3ds Max and then I actually cut the shape of the building out of the textured cube.
Next I re-UVW mapped new sections of the building that had stretched textures. I then used Photoshop to create a faux heightmap for the texture based off of the image.
I then used Crazybump to combine an automatically generated normal map with my custom painted heightmap to create this normal map:
To finish off the model I added some Ukrainian signs that use a separate texture map. And, finally, here is the final result in the Editor:
While it's best to create high-poly models and bake normal maps for important assets, for background assets like this bunker/outbuilding, Photoshopping a heightmap for use in Crazybump can produce nice results while saving time.
That's it for this blog post. In the coming days I'm going to be working on more terrain detailing, preparing some of the bridges and rail systems, and getting more textured assets in the editor!


11 Comments
Recommended Comments