So, I was lurking around the forums looking for some action, you know ... some real crazy action. That kind of action you get from watching a Michael Bay movie, and I got it alright. I got it real good.
Some homies chatting right here, wanting to know how they can get GLEW playing nice with UAK:
Well guess what guys, strap your eyeballs in ... cos I'm about to take them for the ride of their lives!
Lets kick things off by starting up a fresh, raw, uncensored ... raw? Visual Studio project!
A precursor before you continue reading. This is for Windows only, if you are on anything else then God speed.
Project Setup w/ Blank C++ Project.
You can do this one of two ways, or maybe even two of two ways. UAK has a real fancy application that can help you set up a Visual Studio project through Steam. Or, if your an old-schooler (like me), you can simply set up a blank C++ project. Either way, I don't care, cos let's be honest cuh ... if you can't even make a Visual Studio project, then what the heck you doing here, at Slippy's Corner ... at this hour, shouldn't you be in bed by now? Slippy got gat's, you feel me?
For real though, let's put our big boy pants on and ditch the UAK project launcher (sorry Josh).
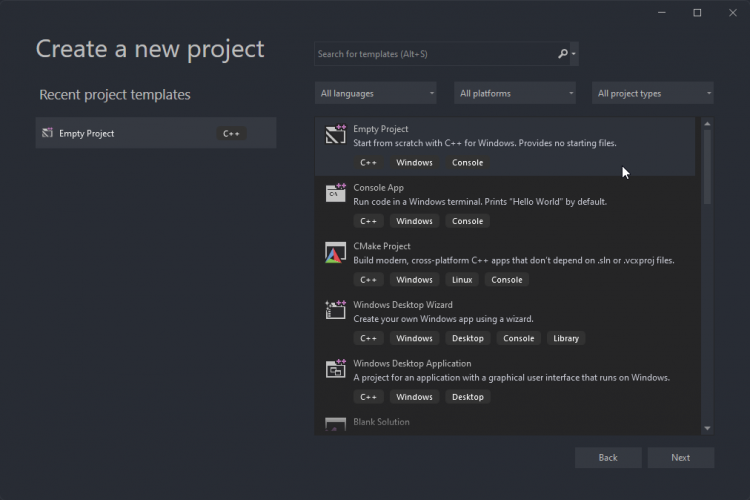
Fire up Visual Studio and select the "Create a new project" option, choosing "Empty Project" on the right.
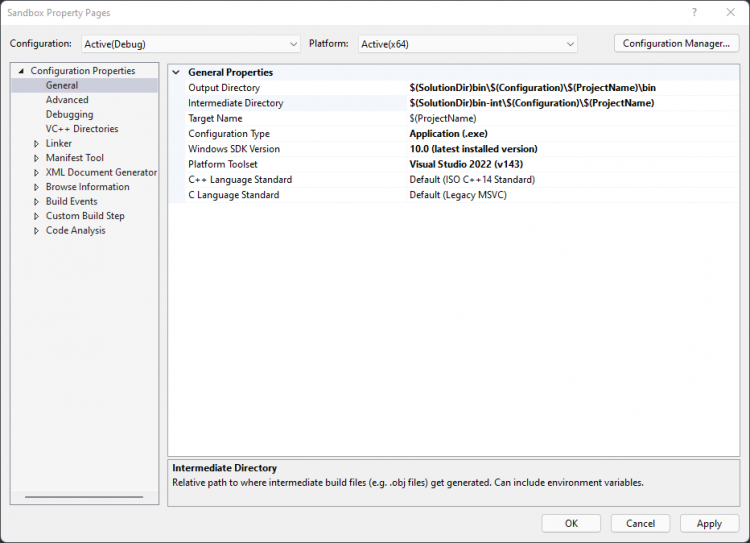
Once everything has loaded right-click your project in the Solution Explorer and go to Properties (Alt+Enter if your a shortcut loser, just kidding, shortcuts are cool). You'll get the properties page of your project, we want to set some general paths for our Output Directory and Intermediate Directory. Both directories refer to where your built binaries go. Output is where the built Configuration Type goes to (that's the type of application you are making, we are making an executable .exe). Our intermediate path is where all the files our compiler creates and uses to build our application goes:
Feel free to copy mine, or if you have a personal preference then go with that, I won't judge.
As an optional step here, depending on how you set up your project (if you did it through creating a blank C++ project like I suggested above) then you'll have to link up the UAK library and also include the sweet nectar, the elixir of life. The header files.
This is good to go through as its a nice practice run for when we get our hands full of GLEW, real sticky, pungent GLEW. Hey, if you did set up your project using the UAK app on Steam then I'd recommend to delete that and start off with a blank C++ project, if you got the nards! Go on, I dare you.
Ok, enough messing around, lets go and create some folders to keep our project in order (this is optional, only follow this if you have made a blank C++ project).
Right-click your solution in the Solution Explorer within Visual Studio (that's the top-most item in the list) and choose "Open Folder in File Explorer". We want to create a folder here called Dependencies, within that folder make another new folder called UAK. Now, hop into that folder (reminds me of that movie Inception) and make two new folders, one called includes and another called libs.
Having fun yet? Well there is more, a lot more. We now need to go and get those UAK dependencies, otherwise we won't have access to any UAK code. Head on over to your Steam installation and go to "steamapps > common > Ultra App Kit > Library > Windows > x64 > Debug", in there we should see AppKit.lib. Copy that and paste it in our libs folder that we made earlier. This is the .lib file we will want to link later in Visual Studio.
Now go back to the root Ultra App Kit folder and you should see an Include folder. Select everything in this folder and copy and paste it into our includes folder we made earlier. These files make up the necessary code files that together forms the UAK API.
Ok, so far we have copied the UAK dependencies into their respective folders. Now we can go back to Visual Studio and get into the nitty-gritty.
Right-click your project in the Solution Explorer and open up the properties page again. I gonna warn you here that if you don't follow these instructions explicitly then your computer may combust into a spectacular ball of fire, so listen up carefully! <-- I'm just kidding guys, don't panic.
In the Linker drop-down on the left you should see a General section, click that and it will reveal new options on the right pane. We are looking for the option "Additional Library Directories" you should see it half way down, buried in the abyss of other frightening options we must not touch. Clicking that option will display yet another drop-down on the fields far right, click this and choose <Edit...>.
Now we need to enter the path to our UAK libs folder. There are some special macro's we can use (just copy and paste the below snippet if your lazy):
$(SolutionDir)Dependencies\UAK\libs
If you look in the "Evaluated value:" box you should see it has retrieved the correct path!

I know right, this is pretty wild!
There is one last step, we need to head to the Input section within the Linker drop-down and in the "Additional Dependencies" field enter AppKit.lib; (don't forget that semi!)

Now, we are gonna do the same thing for our includes directory, but there is one extra step we need to do for this.
Accept and OK the changes we have made in the project properties as we would like to save the hard work we have made so far. Now in the Solution Explorer we are going to add our first source code file. Right-click the Source Files folder filter in the Solution Explorer and go to Add > New Item. From the new dialog box we want to add a .cpp file. I'm going to call my Application.cpp.
With this file now added we can right-click our project and head to the properties once again!
The keen-eyed readers here will notice that we now have a new drop-down on the left, the C/C++ drop-down. Let's click it and go to the General properties. Similar to what we did with our libs folder, we now want to add our includes folder using the special macro's from before:
$(SolutionDir)Dependencies\UAK\includes
Hit apply and OK to save our changes.
Ok, with all that out of the way we are back on track. Again, I'd like to reiterate that if you didn't make a blank C++ project then all of the above was completely pointless and I can only assume that you continued reading it to expand your vocabulary palette, or maybe my fore-warning wasn't clear enough ... either way, I can only apologise.
Downloading & Linking GLEW.
We are finally here and we are ready to get sticky.

We first need to download GLEW, head over to this link where you can get the official GLEW binaries (download the binaries, not the source code) http://glew.sourceforge.net/.
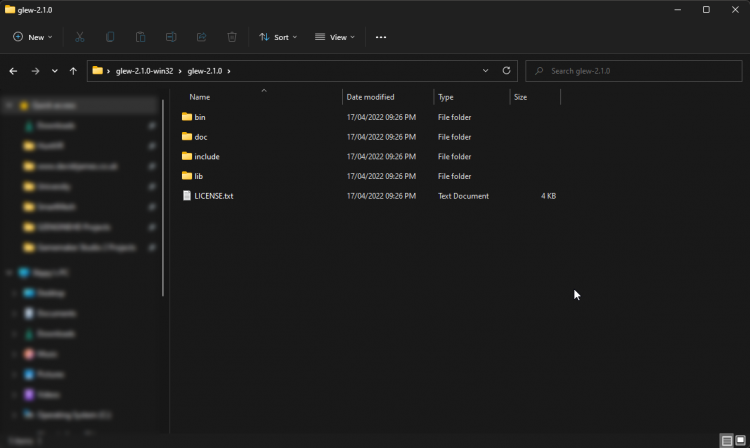
Once we have downloaded and extracted the GLEW zip we should see the following folder structure:
We are interested in the include and lib folders. First we will deal with the lib folder.
Take a peek inside it, what do you see? Maybe a nice picture of a sunrise, or a .mp3 file called sounds of the ocean, no? Surprise! Its another folder. Lets see whats inside this one. Ok, you gotta be kidding me, two more folders! Let's pick the x64 folder.
Now before you think your on a roll here with your copying and pasting, take a second to check that we have two .lib files and one has an "s" on the end of its name. What this is referring to is the static version of the GLEW library. Now I'm not going into all the details of dynamic and static linking here, but to make our lives easier lets pick the glew32s.lib file, as you have probably guessed we are going to statically link GLEW in our project.
Before we copy and paste that .lib file we need to head to our solutions directory and go to the Dependencies folder as we have 3 new folders to make. Similar to our UAK folder structure, we are going to do the same thing for GLEW. So, inside Dependencies create a new folder called GLEW (if you can't remember what we did here just go to Visual Studio and right-click your solution file which will be the top-most item in the Solution Explorer list and click "Open Folder in File Explorer"). Inside our newly made GLEW folder, lets make those two new includes and libs folders.
With that all done we can now copy and paste the glew32s.lib file into our libs folder we just created. Now we can head to the include folder where we extracted our GLEW download and copy and paste the GL folder into our includes folder.
This next step is pretty much a rinse and repeat of what we did earlier to get UAK setup in our project. Going back to Visual Studio, we right-click our project and choose Properties. Let's go to the Linker, General option and look for "Additional Library Directories", selecting the fields drop-down and choosing <Edit...>.
To make our lives easier we can double click our UAK entry, copy and paste it underneath and simply change the UAK part of our path to GLEW 😎
Lets not forget the Input section, choose this from the Linker drop-down and enter glew32s.lib in the "Additional Dependencies" field.
As a last step we simply need to include our includes (see what I did there). Go to the C/C++ drop-down and select the General option. Click the top "Additional Include Directories" field drop-down (the little drop-down that appears on the far right) and choose <Edit...>. In the new dialog that appears we can do the same trick we did when we linked our GLEW lib file. Copy and paste our existing UAK entry and change the UAK part of our path to GLEW.
GLEWing It All Together
If you have made it this far then I have to congratulate you. We have successfully included and linked both UAK and GLEW! There are just a few more things we need to set up to get rid of some errors we will inevitably get when starting to use both libraries in our code.
If you are still in the Properties dialog of your project then head on over to the C/C++ section and go to Preprocessor. In here we need to set a definition in the "Preprocessor Definitions" field. Clicking in the field, enter the following definition:
_ULTRA_APPKIT;
This ensures that all the other stuff found in the UAK include files aren't included.
With this we are finally ready to start using GLEW, OpenGL and UAK. We need to include one final, important library ... OpenGL. To do this head back to your project properties by right-clicking your project in the Solution Explorer and choosing Properties. Head to the Linker, Input section and in the "Additional Dependencies" field enter:
opengl32.lib;
An important note, when using GLEW you have to make sure that its initialized after a rendering context has been created.
We do need to include one more library, but this one is easy, its a header-only library which means we don't need to do anything with the linker. Head on over to the GLM Github link here and click the green Code button (somewhere near the top-right of the screen) making sure to select "Download ZIP". Once you have downloaded GLM, extract it (the folder will likely be called "glm-master"). Navigate into the extracted folder and you'll see a folder named glm. Copy this entire folder and paste it inside our Dependencies folder. Now, I challenge you to figure out how you should include GLM in your project Properties (if you don't know how to do it check below in the Conclusion section).
Without getting into the complexities of writing a shader class and coding and parsing GLSL shaders, I have edited the example code from the UAK documentation to include a Vertex struct for us to get some data into the graphics pipeline (maybe another blog for another time)
For now, simply copy and paste the following code into your .cpp file:
#include "UltraEngine.h"

#define GLEW_STATIC
#include <GL/glew.h>
#include <GL/GL.h>
#include <glm.hpp>

using namespace UltraEngine;

struct Vertex
{
    glm::vec3 Position;
    glm::vec3 Normal;
    glm::vec2 TexCoords;
    glm::vec3 Tangent;
    glm::vec3 Bitangent;
    glm::vec4 Colour;

    Vertex()
    {
        Position = { 0.0f, 0.0f, 0.0f };
        Normal = { 0.0f, 0.0f, 0.0f };
        TexCoords = { 0.0f, 0.0f };
        Tangent = { 0.0f, 0.0f, 0.0f };
        Bitangent = { 0.0f, 0.0f, 0.0f };
        Colour = { 0.0f, 0.0f, 0.0f, 0.0f };
    }

    Vertex(glm::vec3 position, glm::vec4 colour)
    {
        this->Position = { position };
        Normal = { 0.0f, 0.0f, 0.0f };
        TexCoords = { 0.0f, 0.0f };
        Tangent = { 0.0f, 0.0f, 0.0f };
        Bitangent = { 0.0f, 0.0f, 0.0f };
        this->Colour = { colour };
    }
};

// Callback function for resizing the viewport
bool ResizeViewport(const Event& ev, shared_ptr<Object> extra)
{
    // If the window resize event is captured
    auto window = ev.source->As<Window>();

    // Get the new size of the applications window
    iVec2 sz = window->ClientSize();

    auto viewport = extra->As<Window>();

    // Set the position and size of the viewport window
    viewport->SetShape(200, 8, sz.x - 200 - 8, sz.y - 16);

    return true;
}

int main(int argc, const char* argv[])
{
    // Get the available displays
    auto displays = GetDisplays();

    // Create a window
    auto window = CreateWindow("OpenGL Example", 0, 0, 800, 600, displays[0], WINDOW_TITLEBAR | WINDOW_RESIZABLE);

    // Create user interface
    auto ui = CreateInterface(window);

    // Get the size of the user-interface
    iVec2 sz = ui->root->ClientSize();

    // Create a treeview widget
    auto treeview = CreateTreeView(8, 8, 200 - 16, sz.y - 16, ui->root);

    // Anchor left, top and bottom of treeview widget
    treeview->SetLayout(1, 0, 1, 1);

    // Add nodes to the treeview widget
    treeview->root->AddNode("Object 1");
    treeview->root->AddNode("Object 2");
    treeview->root->AddNode("Object 3");

    // Create a viewport window
    auto viewport = CreateWindow("", 200, 8, sz.x - 200 - 8, sz.y - 16, window, WINDOW_CHILD);

    // Adjust the size of the viewport when the applications window is resized (this will callback to our ResizeViewport() function)
    ListenEvent(EVENT_WINDOWSIZE, window, ResizeViewport, viewport);

    // Initialize an OpenGL context (get a hdc)
    HWND hwnd = (HWND)(viewport->GetHandle());
    HDC hdc = GetDC(hwnd);

    // Specify the format of the default framebuffer
    PIXELFORMATDESCRIPTOR pfd =
    {
        sizeof(PIXELFORMATDESCRIPTOR),
        1,

        // Flags
        PFD_DRAW_TO_WINDOW | PFD_SUPPORT_OPENGL | PFD_DOUBLEBUFFER,

        // Framebuffer colour format (R, G, B, A)
        PFD_TYPE_RGBA,

        // Framebuffer colour depth (32 bit)
        32,
        0, 0, 0, 0, 0, 0,
        0,
        0,
        0,
        0, 0, 0, 0,

        // Number of bits for depth-buffer
        24,

        // Number of bits for stencil-buffer
        8,

        // Number of render-targets in default framebuffer
        0,
        PFD_MAIN_PLANE,
        0,
        0, 0, 0
    };

    // Select an appropriate pixel format that is supported by the hdc
    int format = ChoosePixelFormat(hdc, &pfd);

    if (SetPixelFormat(hdc, format, &pfd) == 0)
    {
        RuntimeError("SetPixelFormat() failed.");
    }

    // Create an OpenGL rendering context using our current hdc
    HGLRC glcontext = wglCreateContext(hdc);

    if (glcontext == NULL)
    {
        RuntimeError("wglCreateContext() failed.");
    }

    wglMakeCurrent(hdc, glcontext);

    if (glewInit() != GLEW_OK)
    {
        RuntimeError("Failed to init GLEW");
    }

    // Create vertex data for a triangle
    Vertex triangle[3];

    // Bottom right
    triangle[0] = Vertex(glm::vec3(0.5f, -0.5f, 0.0f), glm::vec4(1.0f, 0.0f, 0.0f, 1.0f));

    // Top
    triangle[1] = Vertex(glm::vec3(0.0f, 0.5f, 0.0f), glm::vec4(0.0f, 1.0f, 0.0f, 1.0f));

    // Bottom left
    triangle[2] = Vertex(glm::vec3(-0.5f, -0.5f, 0.0f), glm::vec4(0.0f, 0.0f, 1.0f, 1.0f));

    unsigned int triVAO;	// A value OpenGL can reference when we want to use this object
    unsigned int triVBO;	// Much like the triVAO, we can refernce this VBO with this value

    // Using the triVAO and triVBO values as a reference to our objects, we generate veretx arrays and buffers using said references
    glGenVertexArrays(1, &triVAO);
    glGenBuffers(1, &triVBO);

    // Bind the VAO first to say which VAO we want to bind subsequent VBOs to, and then we follow up with binding the relevant VBOs
    glBindVertexArray(triVAO);
    glBindBuffer(GL_ARRAY_BUFFER, triVBO);

    // Assigning our triangle array data to our vertex buffer object
    glBufferData(GL_ARRAY_BUFFER, sizeof(triangle), &triangle, GL_DYNAMIC_DRAW);

    // Position data
    glVertexAttribPointer(0, 3, GL_FLOAT, GL_FALSE, sizeof(Vertex), (void*)offsetof(Vertex, Vertex::Position));

    // Enable the vertex data we formatted above
    glEnableVertexAttribArray(0);

    // Colour data
    glVertexAttribPointer(1, 4, GL_FLOAT, GL_FALSE, sizeof(Vertex), (void*)offsetof(Vertex, Vertex::Colour));

    // Enable the vertex data we formatted above
    glEnableVertexAttribArray(1);

    // Render loop (applications run loop)
    while (true)
    {
        // Check for events
        const Event ev = WaitEvent();

        switch (ev.id)
        {
        case EVENT_WINDOWPAINT:
            if (ev.source == viewport)
            {
                // Get and set the current size of the viewport
                iVec2 sz = viewport->ClientSize();
                if (sz.x < 1 or sz.y < 1) break;

                glViewport(0, 0, sz.x, sz.y);

                // Set clear colour of viewport background
                glClearColor(0.15f, 0.15f, 0.15f, 1.0f);

                // Clear colour and depth buffers
                glClear(GL_COLOR_BUFFER_BIT | GL_DEPTH_BUFFER_BIT);

                // WE ARE RENDERING HERE
                //
                // Work with our triangle vertex array
                glBindVertexArray(triVAO);

                glDrawArrays(GL_TRIANGLES, 0, sizeof(triangle) / sizeof(Vertex));

                glBindVertexArray(0);

                HWND hwnd = viewport->GetHandle();
                auto hdc = GetDC(hwnd);
                SwapBuffers(hdc);
                ReleaseDC(hwnd, hdc);
            }
            break;

        case EVENT_WINDOWCLOSE:
            if (ev.source == window)
            {
                return 0;
            }
            break;
        }
    }

    return 0;
}
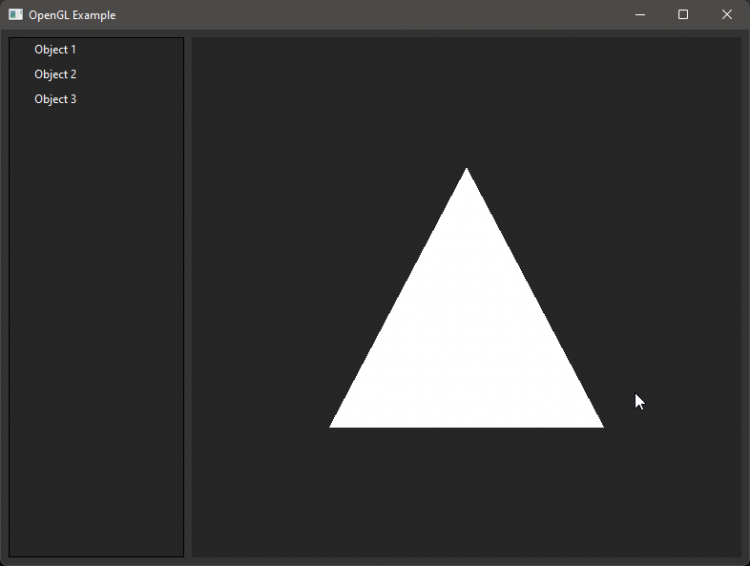
I will come back to this blog at some point and clean up this code but for now running this code will reveal a cool tree view in a panel on the left of the window and a small OpenGL viewport on the right with a white triangle, success!
Conclusion
And there you have it. GLEW and UAK working together. From here the world's your oyster. Abstract to your hearts content to make some wicked cool stuff with modern OpenGL. If there are any issues during setup please comment below and I'd be happy to help.
P.S. For the people that was wondering how to include GLM the process is the same as when we included UAK and GLEW. Right-click your project and go to Properties, then head to the C/C++ dropdown, choosing the General option. Then add the follow path with those awesome macro's:
$(SolutionDir)Dependencies\GLM
Depending on if you kept the glm folder lowercase or uppercase, change the GLM part of the path to reflect that.
Again, I hope this helped, any questions post below.
Stay safe!
Slippy
-
 3
3


33 Comments
Recommended Comments